Testing using an RDT
Types of tests
Before providing malaria treatment to a person, it is important to confirm the presence of malaria parasites in the body. Testing or diagnosis of malaria cases cannot be done by observing signs and symptoms only because other diseases like flu share the same signs and symptoms with malaria.
WHO defines a case of malaria as one that has been confirmed through detection of malaria parasites by using a scientific test such as a rapid diagnostic test (RDT)or microscopy.
These two tests are rapid diagnostic tests and microscopy are the two common methods of malaria diagnosis. However, community health workers ONLY test using rapid diagnostic tests.
Preparing for rapid diagnostic testing
- Take time to explain to the patient what you are going to do
- Read product instructions carefully
- Prepare the following materials
- RDT (new unopened test device, alcohol swab, buffer)
- New, unopened lancet ▪ Disposable gloves
- Timer or watch
- Cotton, alcohol (if swab not supplied with the RDT)
- Box/containers for used lancet/sharps and other infectious waste
- Pencil or marker for labelling the RDT
- Record book and pen for recording the results
- Check expiration date of the RDT and colour of desiccant
- DO NOT use an expired or damaged RDT or an RDT showing signs of exposure to humidity
Note: Exposure to humidity can be observed:
- EITHER by shaking the desiccant; if the granules shake then there has been no exposure but if granules have solidified then there was exposure.
- OR by checking the colour of the desiccant as follows:
- RDT not exposed to humidity desiccant granules remain the original colour of the desiccant (Yellow or White).

- RDT exposed to humidity desiccant granules change from yellow to green.

NB: Do not use rapid diagnostic test which is expired as it may give you false results
Rapid diagnostic testing procedure
(i) Check the expiry date on the package. Do not use RDTs that have expired.
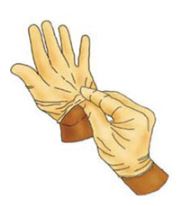
(ii) Put on gloves before beginning (Figure 1).
Use a new pair of gloves for each patient. Do not re-use gloves.
(iii) Open the RDT package and remove the contents. The blood-transfer device — it could be a capillary tube, straw, loop, pipette or other device — is used to collect blood and transfer it to the test cassette. (Once the packet is opened, the ‘desiccant’ sachet which absorbs moisture from the atmosphere in the package should be discarded.) The test cassette (shown later, in Figure 7) is used to conduct the test. The square hole labeled ‘A’ is where you add the blood. The round hole labeled ‘B’ is where you add the buffer.
(iv) Write the patient’s name on the cassette (Figure 2).
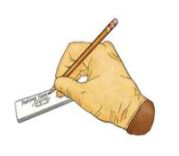
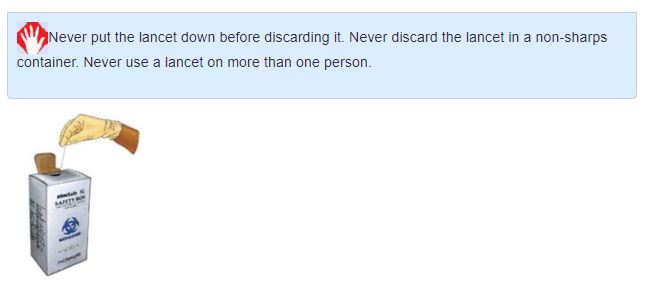
Figure 3: Write the patient’s name on the cassette.
(v) Open the alcohol swab and clean the patient’s third or fourth finger with alcohol (Figure 4). This is to prevent infection. Other fingers may be used if necessary. Ask the patient: ‘Are you right-handed or left-handed?’ If the patient is right-handed, choose a finger on their left hand. If the patient is left-handed, choose a finger on their right hand.
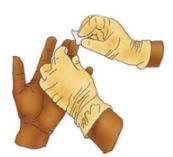
Figure 4: Clean the patient’s finger with alcohol.
(vi) After cleaning the finger with the alcohol swab, the finger must be allowed to air dry. After using the alcohol swab, place it on its wrapper and set it aside on the table. You will use it again to stop the bleeding after you collect the patient’s blood.
(vii) Once the patient’s finger is dry, open the lancet. Prick the patient’s finger, preferably towards the side of the pulp (ball) of the finger. Discard the lancet in a sharps-only container immediately after using it.

Figure 5: The lancet used in the RDT must be put in a ‘sharps only’ safety box.
(viii) Turn the ‘patient’s’ arm so their palm is facing downward. Squeeze the pricked finger and allow a drop to well up below the finger tip as in Figure 6. Use the loop or capillary tube or straw or the pipette to collect the drop from underneath. Once you have collected a sufficient amount of blood, you may hand the alcohol swab back to the patient and show him or her how to use it to stop the bleeding
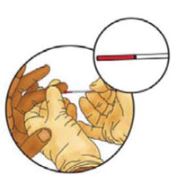
Figure 6: Drawing blood with a capillary tube.
(ix) Use the device (capillary tube, straw, loop, pipette or other) to add the drop of blood to the sample window (square hole labeled with the letter A, see Figure 7). The blood needs to reach and be absorbed by the pad at the base of the square hole. If the blood is mostly deposited on the plastic edges of the well, but does not reach the pad, the test will not work correctly. Deposit the blood in the correct place using the capillary tube, straw, loop, pipette or other. Adding too much or too little blood can cause the test to give an invalid result or be difficult to read.
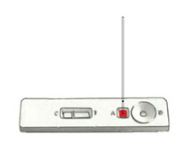
Figure 7: Adding blood to the RDT cassette.
(x) Add the buffer solution to the round hole labeled B. Hold the bottle vertically when adding the buffer solution, as in Figure 8. This ensures the correct drop size.
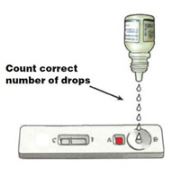
Figure 8: Adding the buffer solution.
(xi) Wait for the correct duration of time (15 or 20 minutes) after adding buffer before reading the test results.
(xii) Discard the blood-collection device (e.g. capillary tube) safely after use.
(xiii) Remove and discard your gloves at this time. To avoid possible contamination, the used gloves should be discarded in the non-sharps container before you do anything else.
Figures 1-7 are from WHO, 2006, How to Use a Malaria Rapid Diagnostic Test (RDT): A Guide for Training CHWs and Other Health Workers.Reading RDT Results
An important part of malaria diagnosis is to be able to read, interpret and record results correctly.
There are three possible results in an RDT test. These are positive, negative, or invalid.
- The test is positive if the malaria parasites are found in the patient’s blood.
- The test is negative if there are no malaria parasites in the patient’s blood. This means that further investigation is required to determine the cause of the fever.
- The test is invalid if it shows no defined reading of being either a positive or negative result. This can occur when the test is not done correctly or when the RDT is damaged.
The images below show how RDT results are read:
Positive: lines appear in both the “control or C” window and the “Test or T”.

Note:The test is positive even if the line on “Test or T” is faint. As indicated below

Negative: Only one line appears in the “Control or C” window. There must be no lines in the “T” window”.

Invalid result: If there is no line in the “C” window (or there are no lines at all), then the test is invalid

Key points to remember for RDT use
- Follow RDT instructions strictly.
- Keep a copy of the product insert handy.
- Do not use expired or damaged RDTs.
- Do not use the RDT if the pouch/packet is punctured or damaged or the desiccant has changed colour.
- Do not mix buffers, cassettes of different RDT brands.
- Open the RDT pouch just before using it.
- Avoid prolonged exposure to humidity during RDT preparation.
- Store RDTs in a shady, cool place.
- Read and interpret test results after or within the time specified by the manufacturer.
- Do not re-use RDTs.
- Always observe blood safety practices.